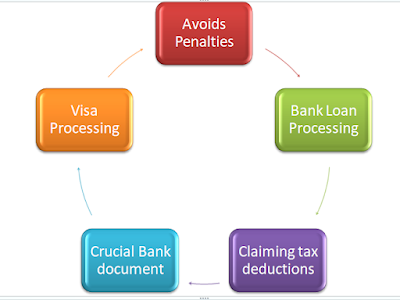
In recent times, GOI India has taken very good initiatives, and the ITR online platform is one example where even citizens with no accounting background can file an income tax return without any support or dependency. In India, approximately 1.46 crore citizens pay tax regularly (1% of the total population) out of 136 crore of its population, and the purpose of making the ITR platform simpler is so that earning citizens from all educational backgrounds can easily access it and file returns on a regular basis without any misses, and the Income Tax Department can get accurate data. Only 3% of Indians earn more than Rs. 5 lakh per annum, out of which, in 2020, approx. 1.6% of tax payers filed ITR.
That's the only reason Aadhar is mandatory to be linked with a PAN card, as citizens with multiple bank accounts have a consolidated view of income earned during a particular financial year. More focus is on digitalization, leading to easy tracking of spend vs. actual amount received, whether for salaried personnel or businessmen.
Digitization also helps in eliminating black money transactions, and making payments online either via Wallet or bank transfers helps the Income Tax Department track the flow of transactions and money that is white money. If the payment is done digitally, then it is mandatory to issue invoices or bills, which also helps in getting direct taxes or sales tax paid regularly to the government. These taxes will be used for development-related activities.
Importance Of Filing ITR
Income Tax Slab Of Individual For Assessment Year 2021-22

Steps to file Income Tax Online
Step Number 1) First Tax Payer needs to login into new developed ITR platform which is https://www.incometax.gov.in/iec/foportal/#main-content and click on Downloads option on the portal as from now onwards Tax payer needs to download and Install UTILITY (Java based ITR Software) software which helps tax payer to file tax hazel free. Tax payer will get updated Utility software every year.
 |
| ITR Website - Utility Software Download |
Kindly Note: For password reset, profile validation and update, New registration tax payer need to either click on Login or Register option basis requirement.
Step Number 2) Post Installation of ITR Utility software one will get shortcut of the Utility platform over the desktop by the name ITDe-Filing. Click on the icon and Select Continue where tax payer will get three options to select basis requirement:
- Returns
- Draft Version of Returns
- Pre-filled Data
Returns option needs to be selected in the case of a new return; Daft Version of Return if the tax payer saved the earlier filled tax return without submitting (for changes); and Pre-filled Data contains the tax payer's details. Click on the File Return option to proceed with tax filing.
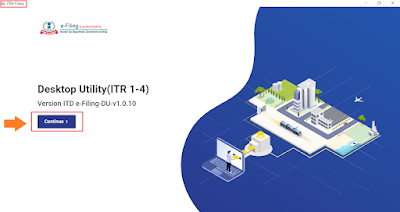 |
| ITDe-Filing Window |
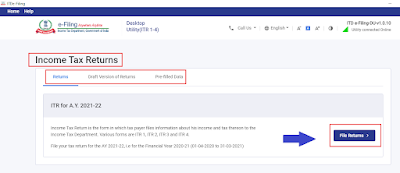 |
| Tax Return Window |
Step Number 3) Tax payers get another three options to select basis requirement or availability, where one needs to either download or import data to proceed:
Download Pre-Filled Data: If the tax payer selects this as an option, all the personal and salary details from the employer will get automatically fetched via JSON (Java Script Object Notation), which is there on the Income Tax website.
Import Pre-filled Data: The tax payer will select this option if JSON (Java Script File) is already downloaded, either from the Income Tax website or any third-party websites like Clear Tax, and wants to import this file to get updated investment details fetched automatically post-upload over the ITR web portal.
Import draught ITR filled in online mode: partially filled online returns can be imported here along with changing the mode of filing from online to offline.
Note: I would prefer to opt to download pre-filled data for filing tax returns, as the ITR website will fetch most of the details, and the taxpayer just needs to validate one by one the accuracy of the information along with investment details and the tax due amount, if any. Click on the Continue option, input your PAN, select the assessment year, and then again click on the Proceed option for the next window. If the PAN detail is not correct, the utility platform will throw an error when trying to input the correct PAN details.
Also Tax payer always gets an option to Go Back and make/select changes.
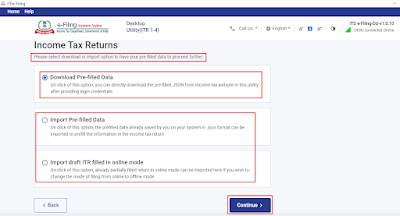 |
| Tax Payer Choice basis JSON file |
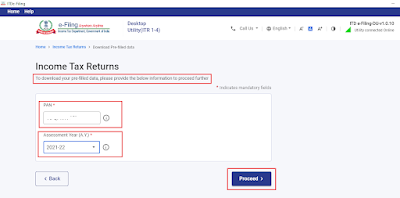 |
| PAN Details and Assessment Year |
Step Number 4) If the PAN details are correct on the next window Tax payer will get a window to again input User name which may be PAN or Aadhar number basis earlier year ITR registered option and need to input password to proceed by clicking Continue option.
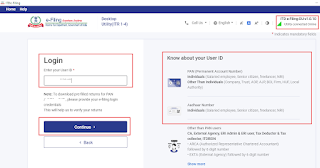 |
| Valid PAN details Check |
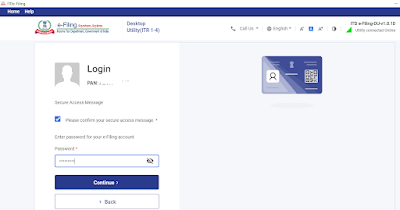 |
| Password window and Secure Selection Check |
Step Number 5) Post-successful login Taxpayer details can be visible along with the assessment year. Click on the File Return option and select from the Individual, HUF, and Others options. Salaried tax payers need to select Individual as an option for filing tax returns and click on the Continue option. On the next window, Salaried tax payers need to select ITR-1 form, and other tax payers, based on their income and nature of business, will prefer to select ITR-2, 3, or 4. Click on Proceed with ITR—1 form for filing a tax return.
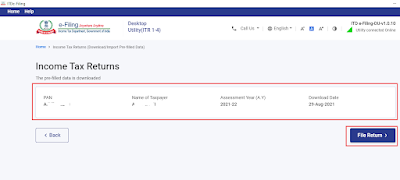 |
| Tax Payer Pre-filled validation |
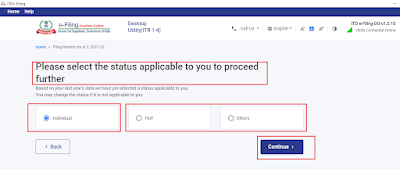 |
| Status Selection - Individual/HUF/Others |
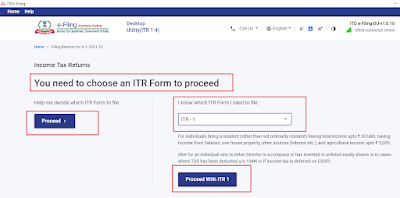 |
| ITR Form Selection |
Step Number 6) Click on the Let's Get Started option and select the reason for income tax return basis eligibility. Most salaried taxpayers will select "Taxable income is more than the basic exemption limit" as an option and click on Continue. On the next window, the tax payer needs to validate and update the below details (the ITR Utility Tool will auto-fetch the maximum information, and missing information needs to be updated from the tax payer's end).
- Personal Information - PAN/Aadhar/Salary, Bank details, New and Old Tax Regime selection.
- Gross Total Income - Tax Payer need to validate Salary Exemption basis LTA/Children allowance, House rent allowance etc.
- Total Deductions -
- Taxes Paid
- Total Tax Liability
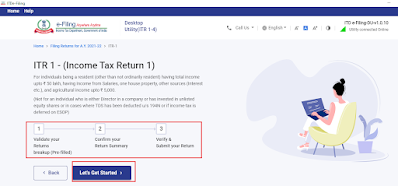 |
| Filing Start Post ITR form Selection |
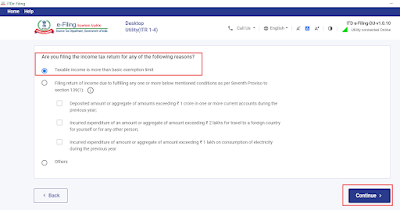 |
| Basis Taxable Income Option need to be selected |
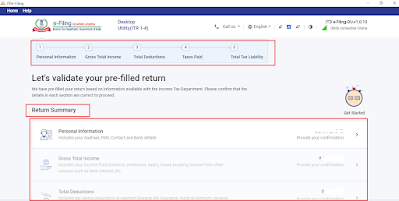 |
| Pre-Filled Return Validation Page |
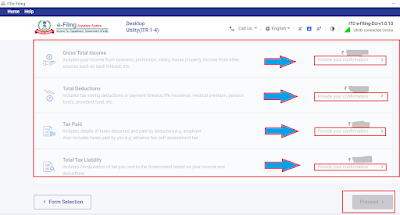 |
| Pre - Filled Validation Continues... |
Step Number 7) Taxpayers need to confirm pre-retuned data one by one by clicking on the options below the return summary. Once a green tick with confirmed appears, only the taxpayer will be able to proceed to the final submission window. This is the window where the tax payer gets investment sections based on requirements like 80C (LIC, ELSS, FD, etc.), 80D (Medical Insurance), 24B (Loss From House Property-Interest Component), Interest Earned from Banks, 80E (Higher Education), etc. One needs to validate and update the invested amount for a particular financial year, along with the selection of the correct option by YES or NO on each subcomponent under the Return Summary head. In the case of yes, one needs to validate the amount with Form 16, which was submitted to the employer.
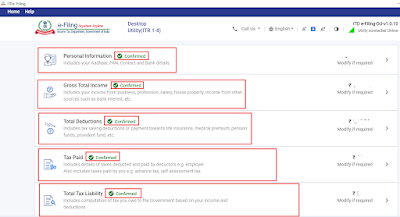 |
| Post Validation - Confirmation Tick Appear |
Note: One needs to keep in mind that without confirmation, the taxpayer will not be able to submit an income tax return. Also, the total tax liability for a particular financial year will be known under the component total tax liability section, where tax payers need to agree on the pending or zero tax amount. In case in Form 16 total tax liability is showing zero and over ITR platform with some amount, then all the above components need to be validated one by one again as there is always the possibility that some of the sections, whether 80C, 24B, etc., may have partial or no amount appearing over ITR platform compared to Form 16.
Bonus Snapshots of the Personal Information Component where Tax Payer get an option to select Return criteria u/s 139(1) which is return filed on or before due date, 139(4) belated return filed after due date etc basis tax payer's requirement. Also Tax payer will get selections like New and Old tax regime along with Bank accounts enabling for refund under this component only. Its very crucial to validate all the sub-components one by one by Tax payer before final submission.
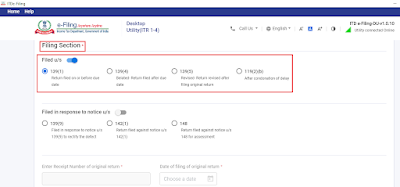 |
| Filing Section window |
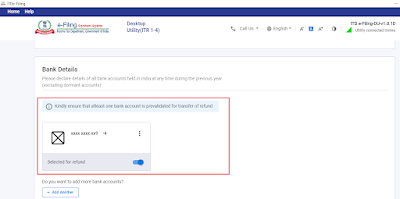 |
| Bank Details Addition/Selection for Refund |
Step Number 8) Once validation and updating get completed for all the ITR components, the tax payer needs to click on Proceed and post that total claimed amount window, which will provide the final amount details that the tax payer is claiming along with the total tax liability to be paid to the Income Tax Department, if any.
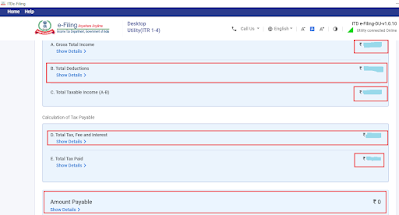 |
| Final Computation Amount |
Step Number 9) The final validation window appears once the taxpayer gives consent to proceed with PAN and verification declaration confirmation. If all the required fields are complete without partial information, the taxpayer will go to Preview and Submit. On the preview and submit window, the tax payer gets another option to save a JSON file, which can be considered at Step Number 3 for the import of the income tax return but is not verified and requires some modification. There is always an option to correct an error at this stage, which is the last stage before e-verification.
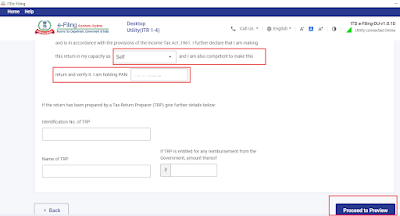 |
| Declaration Confirmation |
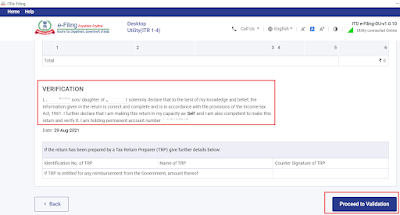 |
| Verification Confirmation |
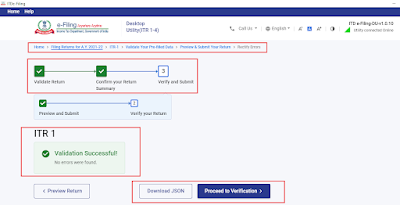 |
| Validation Confirmation & JSON File download |
Step Number 10) Final and one of the important steps without which ITR is considered incomplete is the e-verification of the ITR filed with the help of Aadhar OTP (most commonly used) or any of the other available e-verification modes based on the taxpayer's preference. This is one of the reasons it's mandatory to link Aadhar with PAN details. Also, the taxpayer needs to make sure that Aadhar has updated mobile number details so that an OTP can be received without any issue.
If the taxpayer is confident enough with the provided investment details and matches all the components carefully, one can immediately E-Verify, or there is an option to E-Verify later; however, the maximum number of days for E-Verification is 120 days from the date of final submission over the ITR portal.
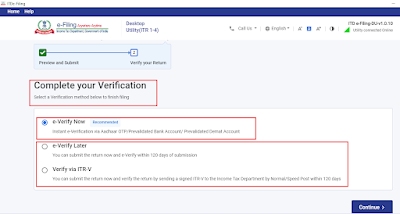 |
| Aadhar Based OTP Verification |
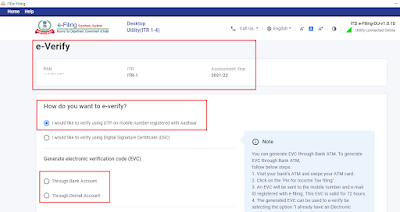 |
| Pre Filled Details Before Mode Of Verification |
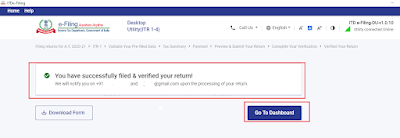 |
| Final Confirmation Post Successful Authentication |
Step Number 11) Once E-Verification get completed Tax Payer can check the status of the ITR by login into ITR new website via link https://www.incometax.gov.in/iec/foportal/#main-content. The taxpayer needs to validate the Pending Action option for any further action. For example, in the case of any pending tax liability, post-payment, the taxpayer needs to share the acknowledgement number and other details. The taxpayer will get all those details here under the Pending Action component. Also, in the event of any issue, the taxpayer always has the option to escalate the matter via the Grievance option on this platform.
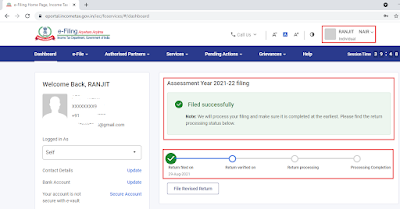 |
| ITR Status Window post E-Verification |
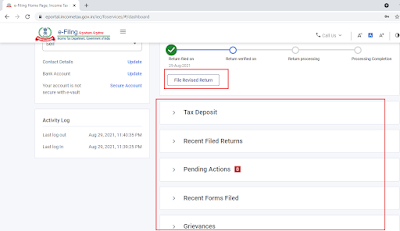 |
| Pending Action and Grievance File |
Important and Most Common used Sections used for Investment
- 80C - Life Insurance Premium, ELSS (Tax saving SIP), Fixed Deposit, NPS, School Fees, PPF, Loan Principal,
- 80D - Medical Insurance - Self, Spouse, Child and Parent (Dependent).
- 24B - Loss from House Property (Interest Paid again Mortgage/Loan).
- 10(13A) - House Rent Allowance
- 10(5) - Leave allowance anywhere in India for a particular financial year
- 80(G) - Donation
 |
| Most Common ITR Sections Used |


